这个小节的目标是添加光线相光内容,根据光线打在屏幕上不同的位置,生成一张蓝白渐变图。

我们可以将光线理解为一条射线,从某个点作为起点,向某个方向发射。例如,从三维世界 (0,0,0)点起始,向(-1,1,2)的方向发射。
博客中的一张图是这样的
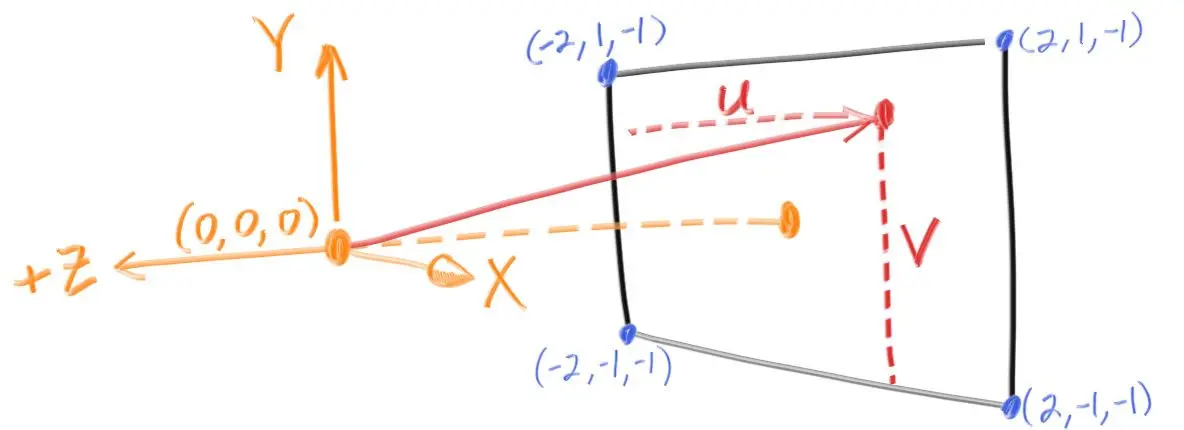
摄像机在(0,0,0)点,坐标正 Y 向上,正 X 向右,正 Z 向屏幕外。从摄像机的位置,向摄像机视口,坐标(U,V)的点,发射一条射线,然后就是计算UV这个点的像素颜色。
vec3.rs 的代码做了微小的改动,重载了对于f64类型计算的操作符,然后给Vec3这个结构体起了一个别名 Color,用来描述 RGB 颜色。
// /src/vec3.rs
use std::ops::{Add, AddAssign, Div, DivAssign, Mul, MulAssign, Neg, Sub, SubAssign};

#[derive(Debug, Copy, Clone)]
pub struct Vec3 {
    pub x: f64,
    pub y: f64,
    pub z: f64,
}

impl Vec3 {
    pub fn zero() -> Self {
        Self {
            x: 0.0,
            y: 0.0,
            z: 0.0,
        }
    }

    pub fn one() -> Self {
        Self {
            x: 1.0,
            y: 1.0,
            z: 1.0,
        }
    }

    pub fn new(x: f64, y: f64, z: f64) -> Self {
        Self { x, y, z }
    }

    pub fn length_squared(&self) -> f64 {
        self.x * self.x + self.y * self.y + self.z * self.z
    }

    pub fn length(&self) -> f64 {
        self.length_squared().sqrt()
    }

    fn to_u64(&self) -> (u64, u64, u64) {
        let x = (self.x * 255.999) as u64;
        let y = (self.y * 255.999) as u64;
        let z = (self.z * 255.999) as u64;
        (x, y, z)
    }

    pub fn get_color_string(&self) -> String {
        let xyz = self.to_u64();
        format!("{} {} {}\n", xyz.0, xyz.1, xyz.2)
    }

    pub fn dot(u: Vec3, v: Vec3) -> f64 {
        u.x * v.x + u.y * v.y + u.z * v.z
    }

    pub fn cross(u: Vec3, v: Vec3) -> Self {
        Self {
            x: u.y * v.z - u.z * v.y,
            y: u.z * v.x - u.x * v.z,
            z: u.x * v.y - u.y * v.x,
        }
    }

    pub fn unit_vector(v: Self) -> Self {
        v / v.length()
    }
}

impl Neg for Vec3 {
    type Output = Self;
    fn neg(self) -> Self::Output {
        Self {
            x: -self.x,
            y: -self.y,
            z: -self.z,
        }
    }
}

impl Add for Vec3 {
    type Output = Self;
    fn add(self, other: Self) -> Self {
        Self {
            x: self.x + other.x,
            y: self.y + other.y,
            z: self.z + other.z,
        }
    }
}

impl AddAssign for Vec3 {
    fn add_assign(&mut self, other: Self) {
        *self = Self {
            x: self.x + other.x,
            y: self.y + other.y,
            z: self.z + other.z,
        }
    }
}

impl Sub for Vec3 {
    type Output = Self;
    fn sub(self, other: Self) -> Self::Output {
        Self {
            x: self.x - other.x,
            y: self.y - other.y,
            z: self.z - other.z,
        }
    }
}

impl SubAssign for Vec3 {
    fn sub_assign(&mut self, other: Self) {
        *self = Self {
            x: self.x - other.x,
            y: self.y - other.y,
            z: self.z - other.z,
        }
    }
}

impl Mul<Vec3> for f64 {
    type Output = Vec3;
    fn mul(self, rhs: Vec3) -> Vec3 {
        Vec3 {
            x: rhs.x * self,
            y: rhs.y * self,
            z: rhs.z * self,
        }
    }
}

impl Mul<f64> for Vec3 {
    type Output = Self;
    fn mul(self, rhs: f64) -> Self {
        Self {
            x: self.x * rhs,
            y: self.y * rhs,
            z: self.z * rhs,
        }
    }
}

impl Mul for Vec3 {
    type Output = Self;
    fn mul(self, rhs: Self) -> Self {
        Self {
            x: self.x * rhs.x,
            y: self.y * rhs.y,
            z: self.z * rhs.z,
        }
    }
}

impl MulAssign<f64> for Vec3 {
    fn mul_assign(&mut self, rhs: f64) {
        *self = Self {
            x: self.x * rhs,
            y: self.y * rhs,
            z: self.z * rhs,
        };
    }
}

impl DivAssign<f64> for Vec3 {
    fn div_assign(&mut self, rhs: f64) {
        *self = Self {
            x: self.x / rhs,
            y: self.y / rhs,
            z: self.z / rhs,
        };
    }
}

impl Div<f64> for Vec3 {
    type Output = Self;
    fn div(self, rhs: f64) -> Self {
        Self {
            x: self.x / rhs,
            y: self.y / rhs,
            z: self.z / rhs,
        }
    }
}

pub type Color = Vec3;
然后添加描述光线的类,新建 ray.rs 文件,在里面添加下面的代码。一条光线,有一个起点 origin,和一个方向 direction。
// src/ray.rs
use crate::vec3::Vec3;

#[derive(Debug, Copy, Clone)]
pub struct Ray {
    pub origin: Vec3,
    pub direction: Vec3,
}

impl Ray {
    pub fn new(origin: Vec3, direction: Vec3) -> Self {
        Self { origin, direction }
    }

    // at 函数相当于将光线进行缩放
    pub fn at(&self, t: f64) -> Vec3 {
        self.origin + self.direction * t
    }
}
然后是 main.rs 做了改动,添加了一个 ray_color 函数,这个函数接受一个光线做为参数,然后计算这条光线所产生的颜色。在这里,我们通过使用光线的方向,计算其所在屏幕的UV坐标,然后使用 Blend 公式,来计算这个UV坐标,应该是什么颜色。
Blend 公式是通用的 blendedValue = (1 - t) * startValue + t * endValue
#![allow(dead_code)]
mod ray;
mod vec3;
use ray::Ray;
use vec3::{Color, Vec3};

// ray_color 函数接受一条光线,计算这条光线打在视口
fn ray_color(r: Ray) -> Color {
    // 将光线的方向标准化,保证其值在 -1 到 1 之间
    let unit_direction = Vec3::unit_vector(r.direction);

    // 为了计算方便,我们将方向的 y 值,从 [-1,1] 映射到 [0, 1]
    let t = 0.5 * (unit_direction.y + 1.0);

    // 做一个蓝白渐变,当 t 为 0 时,就是白色,将 t 为 1 时,就是蓝色
    return (1.0 - t) * Color::one() + t * Color::new(0.5, 0.7, 1.0);
}

fn main() {
    // Image config
    const ASPECT_RATIO: f64 = 16.0 / 9.0;
    const IMAGE_WIDTH: u64 = 400;
    const IMAGE_HEIGHT: u64 = ((IMAGE_WIDTH as f64) / ASPECT_RATIO) as u64;

    // Camera config
    let viewport_height = 2.0;
    let viewport_width = ASPECT_RATIO * viewport_height;
    let focal_length = 10.0;

    let origin = Vec3::zero();
    let horizontal = Vec3::new(viewport_width, 0.0, 0.0);
    let vertical = Vec3::new(0.0, viewport_height, 0.0);
    let lower_left_corner =
        origin - horizontal / 2.0 - vertical / 2.0 - Vec3::new(0.0, 0.0, focal_length);

    // Render
    println!("{}", format!("P3\n{} {}\n255\n", IMAGE_WIDTH, IMAGE_HEIGHT));
    for j in (0..=IMAGE_HEIGHT - 1).rev() {
        for i in 0..IMAGE_WIDTH {
            let u = i as f64 / (IMAGE_WIDTH - 1) as f64;
            let v = j as f64 / (IMAGE_HEIGHT - 1) as f64;
            let direction = lower_left_corner + u * horizontal + v * vertical - origin;
            let r = Ray::new(origin, direction);
            let pixel_color = ray_color(r);
            println!("{}", pixel_color.get_color_string());
        }
    }
}
最后,使用 cargo run > image2.ppm 就可以生成蓝白渐变图。