漫反射的通俗理解是,当一个光线打到某一个物体的某一个点上,这条光线一部分会被吸收,一部分会被随机的反射出去,而反射出去的光线,又可能会打到另一个物体面上的一个点,然后又会被吸收,以及随机的反射出去。现实中的光线可能会无限递归下去,但是我们在程序中实现,不可能无限递归,会设置一个反射次数,达到了那个次数,就停止。
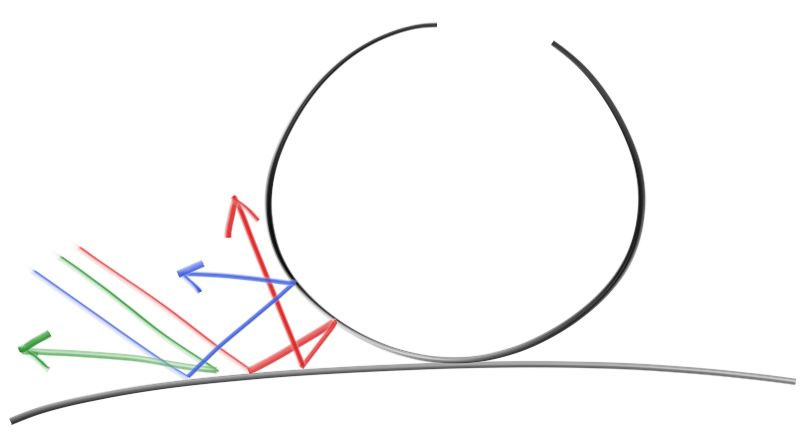
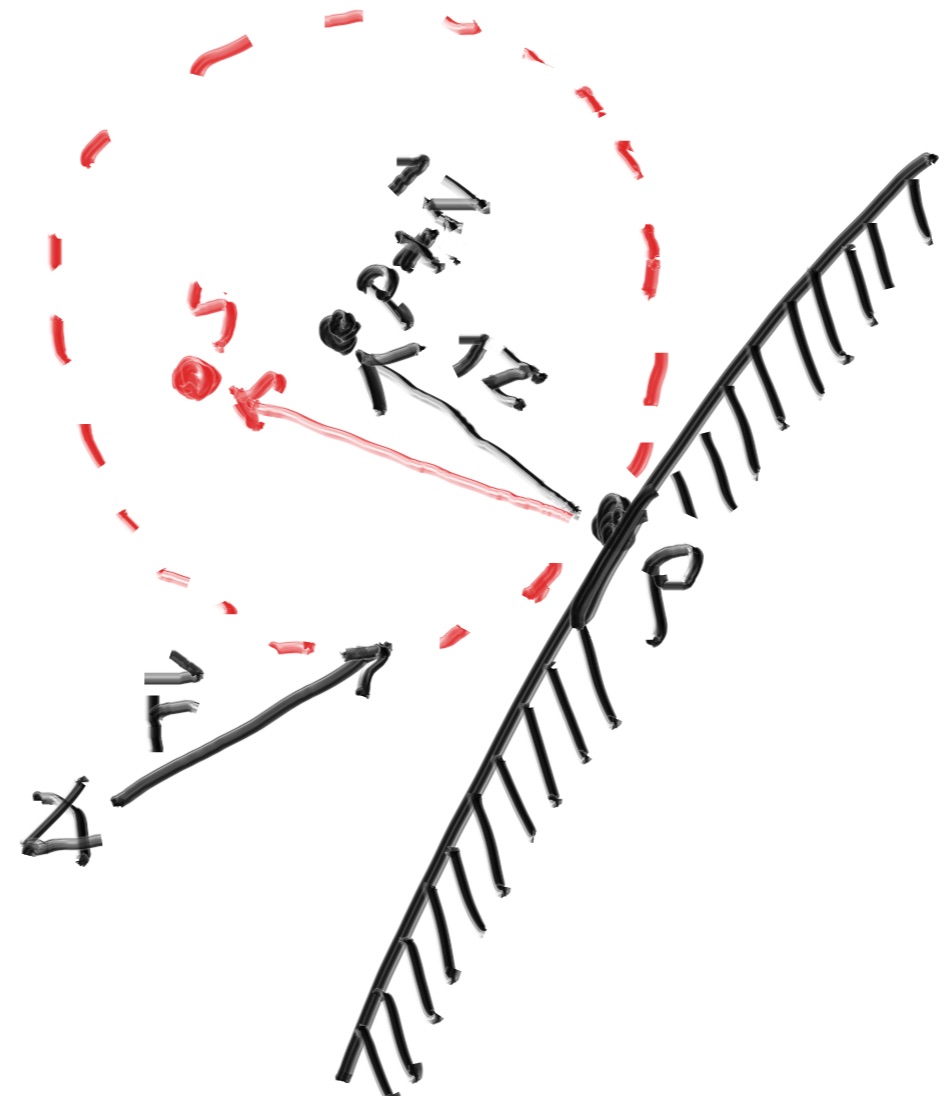
漫反射的实现过程,首先,一条光线打到了物体表面上的一个 P 点,在 P 点法线的那一侧,做一个单位球,这个球与 P 点相切。法线的一侧,我们以球体为例,如果法线向外,那这个单位球就在球的外面,如果法线向内指向球心,那这个单位球就在球的内侧。然后,在单位球内,随机生成一个点 S,然后从 P 到 S 的方向,就是原光线的反射方向,实现上,我们只要从 P 向 S 点再发射一条光线即可。对于每一条光线,重复上面的过程。
还是在上一次的代码基础上修改,主要修改如下
在 Vec3 的实现中添加一个 random_in_unit_sphere 的函数,用于生成单位球内的一个随机点。
// src/vec.rs
pub fn random_in_unit_sphere() -> Vec3 {
    let mut rng = rand::thread_rng();

    let mut p: Vec3;
    loop {
        let x = rng.gen_range(-1.0..1.0);
        let y = rng.gen_range(-1.0..1.0);
        let z = rng.gen_range(-1.0..1.0);
        p = Vec3::new(x, y, z);
        if p.length_squared() >= 1.0 {
            continue;
        }
        break;
    }
    return p;
}
然后修改 main.rs 中的 ray_color 函数,添加光线的随机反射,depth 参数是我们设定的光线反射次数。
// src/main.rs
fn ray_color(r: &Ray, world: &dyn Hittable, depth: i32) -> Color {
    if depth <= 0 {
        return Color::zero();
    }

    if let Some(hit_record) = world.hit(r, 0.0, f64::INFINITY) {
        let target: Vec3 = hit_record.p + hit_record.normal + Vec3::random_in_unit_sphere();
        let ray = Ray::new(hit_record.p, target - hit_record.p);
        return 0.5 * ray_color(&ray, world, depth - 1);
    }

    let unit_direction = Vec3::unit_vector(r.direction);
    let t = 0.5 * (unit_direction.y + 1.0);
    return (1.0 - t) * Color::one() + t * Color::new(0.5, 0.7, 1.0);
}
在 main 函数中添加 MAX_DEPTH 常量,以及修改对于 ray_color 函数的调用。MAX_DEPTH 的大小,对于计算的耗时影响很大,这里设置为了2次,原教程中设置为了50次,但是生成的结果视觉上差别不大,原理上是正确的。如果将 MAX_DEPTH 设置为 50,在我的机器上,2020 款 Mac mini M1,耗时大概接近 1 分钟。
// src/main.rs
fn main() {
    // Image config
    const ASPECT_RATIO: f64 = 16.0 / 9.0;
    const IMAGE_WIDTH: u64 = 600;
    const IMAGE_HEIGHT: u64 = ((IMAGE_WIDTH as f64) / ASPECT_RATIO) as u64;
    const SAMPLES_PER_PIXEL: u64 = 100;
    const MAX_DEPTH: i32 = 2;

    // World
    let mut world = HittableList::new();
    world.add(Box::new(Sphere::new(Vec3::new(0.0, 0.0, -1.0), 0.5)));
    world.add(Box::new(Sphere::new(Vec3::new(0.0, -100.5, -1.0), 100.0)));

    // Camera config
    let cam = Camera::new();

    // Render
    let mut rng = rand::thread_rng();
    let mut image_file_string = String::new();
    image_file_string.push_str(&format!("P3\n{} {}\n255\n", IMAGE_WIDTH, IMAGE_HEIGHT));
    for j in (0..=IMAGE_HEIGHT - 1).rev() {
        for i in 0..IMAGE_WIDTH {
            let mut pixel_color = Color::zero();
            for _ in 0..SAMPLES_PER_PIXEL {
                let u_rand: f64 = rng.gen();
                let v_rand: f64 = rng.gen();
                let u = (i as f64 + u_rand) / (IMAGE_WIDTH - 1) as f64;
                let v = (j as f64 + v_rand) / (IMAGE_HEIGHT - 1) as f64;
                let r = cam.get_ray(u, v);
                pixel_color += ray_color(&r, &world, MAX_DEPTH);
            }

            image_file_string.push_str(&format!(
                "{}",
                color::get_color_string(pixel_color, SAMPLES_PER_PIXEL)
            ));
        }
    }

    println!("{}", image_file_string);
}
还修改了一个地方是,ray_color 函数中的 r: Ray 参数,修改为了引用的形式 r: &Ray。
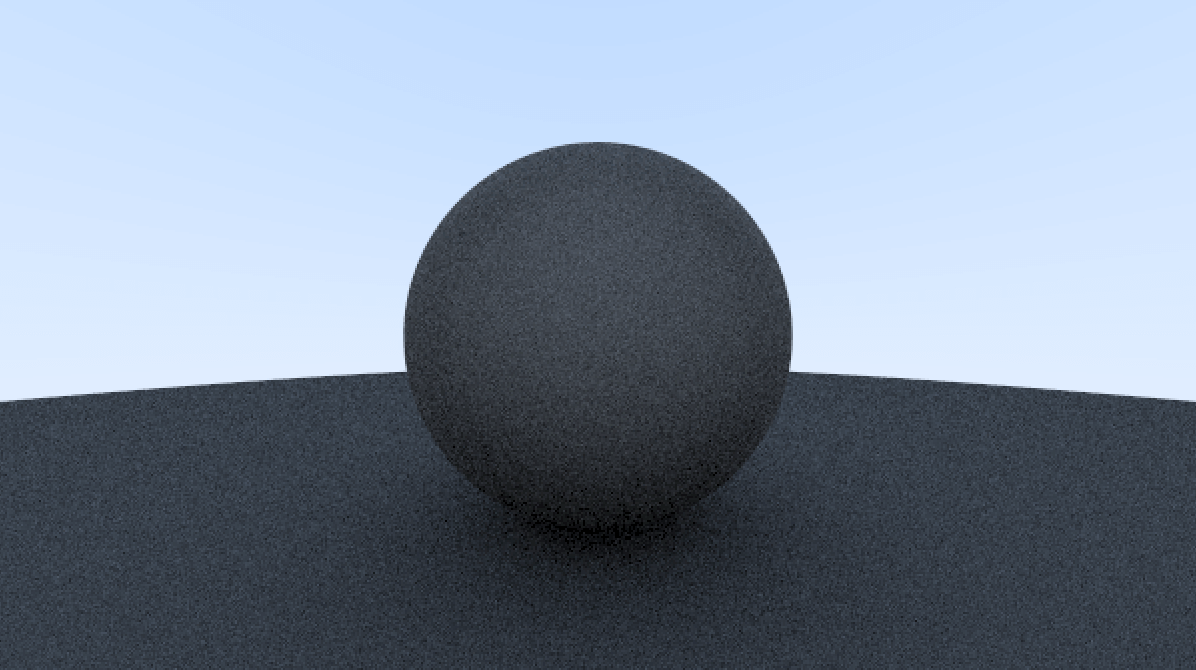
这时,运行将输出下面的结果,这个是未经过伽马矫正的图。

上面的图片看起来很暗,在现实中是不应该这样的,我们的球体只吸收了 50% 的光线,所以另外的 50% 被反射了。之所以看起来很黑,是因为在计算机中,都被假设图像是经过了 gamma 校正的,也就是在将图片的数据存入文件前,进行了一些转换。所以我们也只需要在写入文件前,对颜色进行一定的转换即可。我们可以使用 “gamma 2” (我也不知道这是什么),简单来说就是提升颜色值。计算方式如下
修改 color.rs 中的 write_color 函数,将原来的 r *= scale 变为开平方。
// src/color.rs
use crate::vec3::Vec3;
pub type Color = Vec3;

pub fn get_color_string(pixel_color: Color, samples_per_pixel: u64) -> String {
    let mut r = pixel_color.x;
    let mut g = pixel_color.y;
    let mut b = pixel_color.z;

    // Divided the color by the number of samples and gamma-correct for gamma = 2.0
    let scale = 1.0 / samples_per_pixel as f64;
    r = (scale * r).sqrt();
    g = (scale * g).sqrt();
    b = (scale * b).sqrt();
    // r *= scale;
    // g *= scale;
    // b *= scale;

    let r = (256.0 * r.clamp(0.0, 0.999)) as u64;
    let g = (256.0 * g.clamp(0.0, 0.999)) as u64;
    let b = (256.0 * b.clamp(0.0, 0.999)) as u64;

    format!("{} {} {}\n", r, g, b)
}
最终效果图如下