在前面的文章中,我们渲染出来的图片使用的是漫反射的材质。不同的材质,可以简单理解为对于光线的影响不同,这里的影响包括如何吸收,如何散射等。在这一节,我们将加入另一种材质,金属材质。
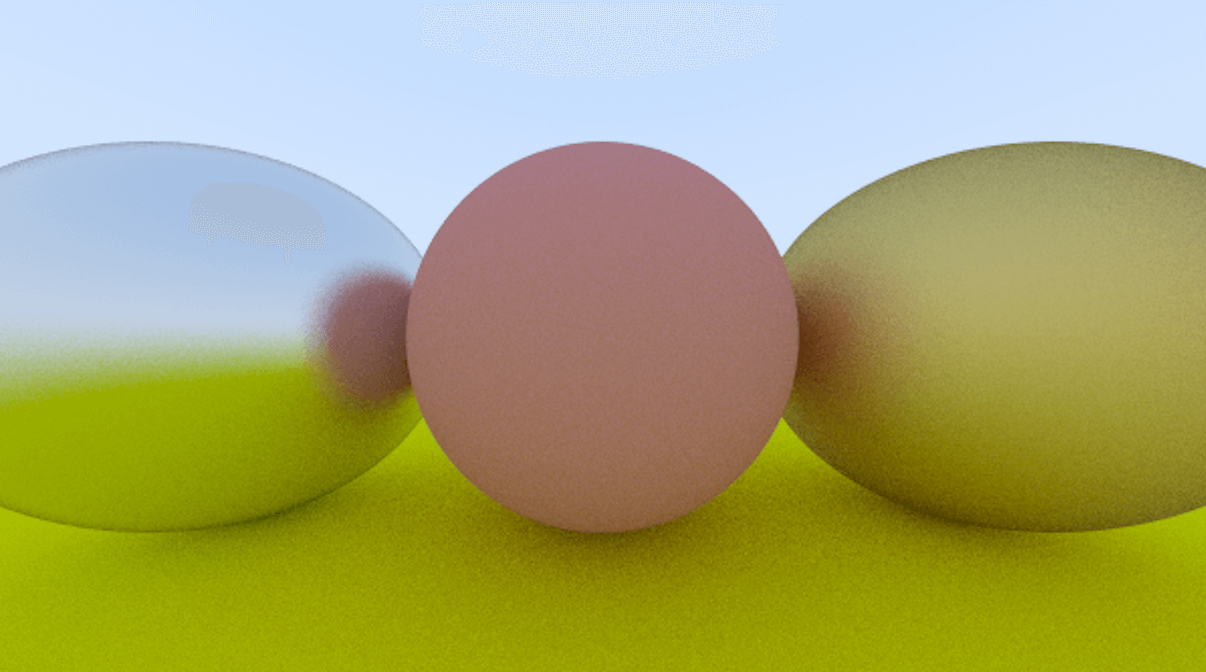
最终的渲染图如下
首先要做的是将材质(Material)相关的代码抽象出来。新建一个 material.rs 的文件,代码如下。
代码大概的含义是将 Material 作为一个 Trait,里面有一个 scatter 方法,这个方法决定了光线如何散射,对于不同的材质,实现自己不同的散射方式。
Lambertian 是漫反射材质的逻辑,里面的变量 scatter_direction 就是我们之前的逻辑中的光线散射方向,在这里还加入了另一个东西,就是判断这个方向的值是否接近于0,如果是,那么直接使用光线打到的点的法线作为方向。有了方向,有了原光线打到的点,就可以产生一条新的从打到的点,到新方向的光线,也就是 scattered 变量。attenuation 是原光线打到的点的颜色,对于漫反射来说,也就是当前材质的颜色,这个值也会返回。
Metal 是金属材质的实现,对于金属材质来说,会比漫反射散射更多的光线,所以看起来会闪亮亮的。散射的原理如下
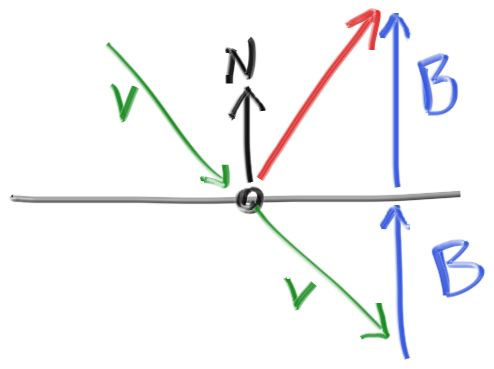
其中, V 是入射光线,N 是标准化的法线,而红色的向量,就是反射光线的方向,它 = v + 2b。这里的 V 不一定是标准化的。b 的长度是 V 点乘 N,因为 V 是向内的,所以这里需要一个负号,将它进行反向,最后的公式就是
$反射光线 = V - 2 * (V \cdot N) * N$
// src/material.rs
use crate::color::Color;
use crate::hittable::HitRecord;
use crate::ray::Ray;
use crate::vec3::Vec3;

pub trait Material {
    fn scatter(&self, r_in: &Ray, hit_record: &HitRecord) -> Option<(Ray, Color)>;
}

pub struct Lambertian {
    pub albedo: Color,
}

impl Lambertian {
    pub fn new(color: Color) -> Self {
        Self { albedo: color }
    }
}

impl Material for Lambertian {
    fn scatter(&self, _: &Ray, hit_record: &HitRecord) -> Option<(Ray, Color)> {
        let mut scatter_direction = hit_record.normal + Vec3::random_unit_vector();
        if scatter_direction.near_zero() {
            scatter_direction = hit_record.normal;
        }

        let scattered: Ray = Ray::new(hit_record.p, scatter_direction);
        let attenuation = self.albedo;
        Some((scattered, attenuation))
    }
}

pub struct Metal {
    pub albedo: Color,
}

impl Metal {
    pub fn new(color: Color) -> Self {
        Self {
            albedo: color,
        }
    }
}

impl Material for Metal {
    fn scatter(&self, r_in: &Ray, hit_record: &HitRecord) -> Option<(Ray, Color)> {
        let unit_ray_direction = Vec3::unit_vector(r_in.direction);
        let reflected = Vec3::reflect(unit_ray_direction, hit_record.normal);
        let scattered = Ray::new(
            hit_record.p,
            reflected,
        );
        let attenuation = self.albedo;
        if Vec3::dot(scattered.direction, hit_record.normal) > 0.0 {
            Some((scattered, attenuation))
        } else {
            None
        }
    }
}
上面代码中用到的两个东西是在 vec3.rs 中,一个是 Lambertian 实现中的 near_zero() 函数。一个是 Metal 实现中的 reflect 函数。代码加到 vec3.rs 中。
// src/vec3.rs
pub fn near_zero(&self) -> bool {
    let border: f64 = 1e-8;
    self.x.abs() < border && self.y.abs() < border && self.z.abs() < border
}

pub fn reflect(v: Vec3, n: Vec3) -> Vec3 {
    v - 2.0 * Vec3::dot(v, n) * n
}
材质抽象完,还需要修改光线打到的点的数据,之前只记录了打到哪个位置,这个位置的法线方向是什么等,现在还需要将打到的点的材质,也加进去,修改 hittable.rs,在 HitRecord 中加入材质相关的记录
在这里,使用了引用的形式来记录打到时的点的材质信息,所上诉人需要生命周期相关的东西。
// src/hittable.rs
use crate::material::Material;
use crate::ray::Ray;
use crate::vec3::Vec3;

#[derive(Copy, Clone)]
pub struct HitRecord<'a> {
    pub p: Vec3,
    pub normal: Vec3,
    pub material: &'a dyn Material,
    pub t: f64,
    pub front_face: bool,
}

impl<'a> HitRecord<'a> {
    pub fn new(p: Vec3, t: f64, outward_normal: Vec3, r: Ray, material: &'a dyn Material) -> Self {
        let front_face = Vec3::dot(r.direction, outward_normal) < 0.0;
        let normal = if front_face {
            outward_normal
        } else {
            -outward_normal
        };

        Self {
            p,
            normal,
            t,
            front_face,
            material: material,
        }
    }
}

pub trait Hittable {
    fn hit(&self, r: &Ray, t_min: f64, t_max: f64) -> Option<HitRecord>;
}
接下来一步就是将材质加入到具体的物体中,也就是我们之前的球体 Sphere。一个物体可以使用不同的材质,所以这里使用了泛型的方式来实现。代码与之前没有什么变化,只是加入了材质,并且在被 hit 时,将材质传给 HitRecord。
// src/sphere.rs
use crate::hittable::{HitRecord, Hittable};
use crate::material::Material;
use crate::ray::Ray;
use crate::vec3::Vec3;

pub struct Sphere<M: Material> {
    pub center: Vec3,
    pub radius: f64,
    pub material: M,
}

impl<M: Material> Sphere<M> {
    pub fn new(cen: Vec3, r: f64, material: M) -> Self {
        Self {
            center: cen,
            radius: r,
            material,
        }
    }
}

impl<M: Material> Hittable for Sphere<M> {
    fn hit(&self, r: &Ray, t_min: f64, t_max: f64) -> Option<HitRecord> {
        let oc = r.origin - self.center;
        let a = r.direction.length_squared();
        let half_b = Vec3::dot(oc, r.direction);
        let c = oc.length_squared() - self.radius * self.radius;
        let result = half_b * half_b - a * c;
        if result < 0.0 {
            return None;
        }

        let sqrtd = result.sqrt();

        // 找到光线打到球面最近的点,有可能光线会穿透球体,与两个点相交,
        // 但是远的点会被近的面遮住,我们看不到,所以这里使用近的点就可以了
        let mut root = (-half_b - sqrtd) / a;
        if root < t_min || t_max < root {
            root = (-half_b + sqrtd) / a;
            if root < t_min || t_max < root {
                return None;
            }
        }

        let t = root;
        let p = r.at(t);
        let outward_normal = (p - self.center) / self.radius;

        let hit_rec = HitRecord::new(p, t, outward_normal, *r, &self.material);
        return Some(hit_rec);
    }
}
最后是修改 main.rs。首先修改 ray_color 函数,将之前里面的漫反射代码去掉,换成调用材质的 scatter 函数来获取打到点的颜色和散射出的新光线方向。代码还是没有什么变化,只是将调用方式换了。
// src/main.rs
fn ray_color(r: &Ray, world: &dyn Hittable, depth: i32) -> Color {
    if depth <= 0 {
        return Color::zero();
    }

    if let Some(hit_record) = world.hit(r, 0.001, f64::INFINITY) {
        if let Some((scattered, attenuation)) = hit_record.material.scatter(&r, &hit_record) {
            return attenuation * ray_color(&scattered, world, depth - 1);
        } else {
            return Color::zero();
        }
    }

    let unit_direction = Vec3::unit_vector(r.direction);
    let t = 0.5 * (unit_direction.y + 1.0);
    return (1.0 - t) * Color::one() + t * Color::new(0.5, 0.7, 1.0);
}
接着,我们需要创建不同的材质,然后再多创建两个球到场景中,将它们使用不同的材质来显示。
// src/main.rs
fn main() {
    // Image config
    const ASPECT_RATIO: f64 = 16.0 / 9.0;
    const IMAGE_WIDTH: u64 = 600;
    const IMAGE_HEIGHT: u64 = ((IMAGE_WIDTH as f64) / ASPECT_RATIO) as u64;
    const SAMPLES_PER_PIXEL: u64 = 100;
    const MAX_DEPTH: i32 = 50;

    let mut world = HittableList::new();

    // 创建不同的材质
    let material_ground = Lambertian::new(Color::new(0.8, 0.8, 0.0));
    let material_center = Lambertian::new(Color::new(0.7, 0.3, 0.3));
    let material_left = Metal::new(Color::new(0.8, 0.8, 0.8));
    let material_right = Metal::new(Color::new(0.8, 0.6, 0.2));

    // World
    world.add(Box::new(Sphere::new(
        Vec3::new(0.0, -100.5, -1.0),
        100.0,
        material_ground,
    )));
    world.add(Box::new(Sphere::new(
        Vec3::new(0.0, 0.0, -1.0),
        0.5,
        material_center,
    )));

    world.add(Box::new(Sphere::new(
        Vec3::new(-1.0, 0.0, -1.0),
        0.5,
        material_left,
    )));

    world.add(Box::new(Sphere::new(
        Vec3::new(1.0, 0.0, -1.0),
        0.5,
        material_right,
    )));

    // Camera config
    let cam = Camera::new();

    // Render
    let mut rng = rand::thread_rng();
    let mut image_file_string = String::new();
    image_file_string.push_str(&format!("P3\n{} {}\n255\n", IMAGE_WIDTH, IMAGE_HEIGHT));
    for j in (0..=IMAGE_HEIGHT - 1).rev() {
        for i in 0..IMAGE_WIDTH {
            let mut pixel_color = Color::zero();
            for _ in 0..SAMPLES_PER_PIXEL {
                let u_rand: f64 = rng.gen();
                let v_rand: f64 = rng.gen();
                let u = (i as f64 + u_rand) / (IMAGE_WIDTH - 1) as f64;
                let v = (j as f64 + v_rand) / (IMAGE_HEIGHT - 1) as f64;
                let r = cam.get_ray(u, v);
                pixel_color += ray_color(&r, &world, MAX_DEPTH);
            }

            image_file_string.push_str(&format!(
                "{}",
                color::get_color_string(pixel_color, SAMPLES_PER_PIXEL)
            ));
        }
    }

    println!("{}", image_file_string);
}
然后 cargo run --release > shiny_metal.ppm,将产生下面的图

与文章刚开始的图不太一样,这是因为,现在渲染出来的是闪亮的金属材质,我们可以加入另一个参数,控制金属的模糊感,使它不那么亮。它的原理就是在原来反射的点,进行一个随机。
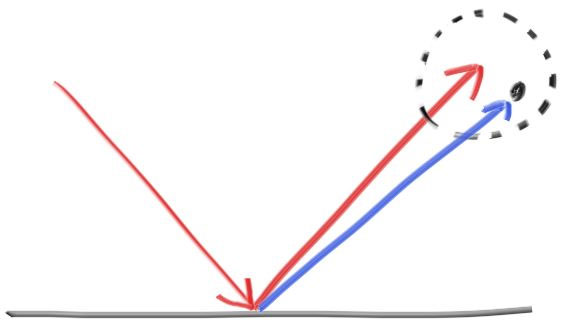
修改 Metal 的实现,加入一个参数 fuzz,来控制模糊的程度,最大值为 1.0。下面代码中,在计算 scattered 的时候,将 fuzz 加入到了运算逻辑中。
// src/material.rs
pub struct Metal {
    pub albedo: Color,
    pub fuzz: f64,
}

impl Metal {
    pub fn new(color: Color, fuzz: f64) -> Self {
        Self {
            albedo: color,
            fuzz: if fuzz < 1.0 { fuzz } else { 1.0 },
        }
    }
}

impl Material for Metal {
    fn scatter(&self, r_in: &Ray, hit_record: &HitRecord) -> Option<(Ray, Color)> {
        let unit_ray_direction = Vec3::unit_vector(r_in.direction);
        let reflected = Vec3::reflect(unit_ray_direction, hit_record.normal);
        let scattered = Ray::new(
            hit_record.p,
            reflected + self.fuzz * Vec3::random_in_unit_sphere(),
        );
        let attenuation = self.albedo;
        if Vec3::dot(scattered.direction, hit_record.normal) > 0.0 {
            Some((scattered, attenuation))
        } else {
            None
        }
    }
}
然后在 main 函数中创建 Metal 材质时,传入模糊参数值。
// src/main.rs
 let material_left = Metal::new(Color::new(0.8, 0.8, 0.8), 0.3);
let material_right = Metal::new(Color::new(0.8, 0.6, 0.2), 1.0);
现在使用 cargo run --release > fuzzed_metal.ppm 生成的图,就是文章开头的图了。